
Currently Stitching: Halloween Broken Dishes Pattern
It's Fall Y'all! Okay so technically I think we passed the Autumn Equinox two weeks or something, but now that it's October, it finally feels real! Even though it's supposed to be 87 for the high today, I'm putting out my decorations anyway! To help get myself in the spirit I've been streaming several spooky flicks and working on a new pattern, using Halloween fabrics from my stash!
 I was inspired by some wonderful spooky quilts I saw floating around the internet! I realized I have never done a Halloween quilt set on a dark background. I don't do many quilts on a dark background in general. But it seems an appropriate time of year to try it out!
 I got started by pulling everything even remotely Halloween-y out of the closet and setting them out on the table. Then I cut it down to easy to recognize prints, and took out some of the repeated patterns and anything that wasn't clearly in one color way. I also removed anything that was realistically too small of a piece of fabric to work with for making these blocks.
 My vision for this project involves the classic broken dishes block. It's been around for along time and is great for using with any theme or fabric line. I am hoping it will help me to show off the spookiness! Because this is a new pattern for me, I am testing it out with larger blocks. I am taking notes as I work my way through the steps to see what does and doesn't work. Then I'll write it up and make it available for download!
 After choosing my colors, I sorted them in to mostly black fabrics, and then purple, orange, and white/ grey, so I could create contrasting triangles. I cut these squares at 9 1/2. So in theory you could make this with a layer cake, scraps or fat quarter if you wanted. However there would be some waste with most of those precuts.
 After pairing up my fabrics, I started sewing all the way around the squares. I laid them right sides together, started in one corner, and I went around all four sides until I was back at the corner where I started.
 Next I cut diagonally across both corners. You could use a rotating mat to do this if you like. For this attempt, I just laid the squares so I could easily move the ruler without disturbing the fabric, and cut it twice. Please be careful when working with these! If you move them too much the blocks will be uneven.
 After cutting there will be four half square triangles (HST) like this. I pressed them all to the dark fabric.
 Here's another example of cutting the HST blocks. After making and pressing the HST blocks, I used my bloc-loc to trim them down to 6 inch squares.
 Once all the blocks were squared I sorted them in to black/ orange, black/ purple, and black/ cream. Then it was time to start working on the layout.
 I first tried it with all the blocks next to each other. No sashing, cornerstones, nada! It felt a little busy and so I tried adding cornerstones and spacing them out.
 Which looked better but I still was not in love.
 (I forgot to take picture) I tried some low volume black and grey prints for sashing and it made the whole thing very muddy. I then tried adding a solid black sashing, and left the spaces for cornerstones, which I mixed and matched. I started with 2 1/2 x 12 inch strips. But I didn't love that either.
 I tried cutting the strips in half. They ended up being 1 1/4 x 12. I took out the cornerstones, and it was getting better! I felt like I was ready to start sewing some of the blocks together to see how it would look. While working on the layout I decided to alternate color rows diagonally. I wanted a lot of orange so I did cream, orange, purple, orange, cream, orange, purple, etc. It feels like it helps the colors stand out more.
Once I got all the sashing and blocks done, I kind of missed the cornerstones! But I needed to pick out one fabric instead of having it scrappy. I also realized I needed to make a few more blocks. #facepalm... But this is one of the issues with creating a pattern sometimes. So many decisions! And it's like an itch I can't scratch until I get the balance right! Does anyone else struggle with that when they're working on a new project?
 The longer I looked at it, I just felt like it wasn't shining. So I decided to turn the whole thing on point! What a difference it made! It's like the lights got turned on! As it turns out, I didn't have enough purple and grey fabrics to add four more blocks to balance it. Instead, I ended up taking out three of the orange/ black blocks to even things up.
 At this point I added the cornerstone blocks back in. I cut them at 1 1/4 x 1 1/4 inches. Very small, I know, but I do really like the look of it in the end.
 I sewed them on to the 1 1/4 x 11 3/4 black sashing strips. I had originally cut the strips at 12 x 1 1/4, but the blocks lost a quarter inch because of the seam allowance.
 Once I had all the strips and corners cut it was time to sew the rows together. It was also time to add the setting triangles in. I made the corner setting pieces by cutting a 12 x 12 block, and cutting it diagonally into four pieces. For the top, bottom, and sides I cut 6 x (13 x13) blocks, and then cut them in half on the diagonal. I should also mention at this point that I mis-cut every single one of these blocks the first time through, so please be careful when attempting on your own.
 Some other notes:
- The sashing rows must ALL be sewn onto the blocks BEFORE adding the triangles. Sew them in between the blocks to make the strips, and then sew the long sashing strips on to the connected blocks. Then the triangles will connect to the sashing and the blocks.
- I had to pin pretty much every single row to make sure it all lined up. Take your time when putting it together or else the points won't like up.
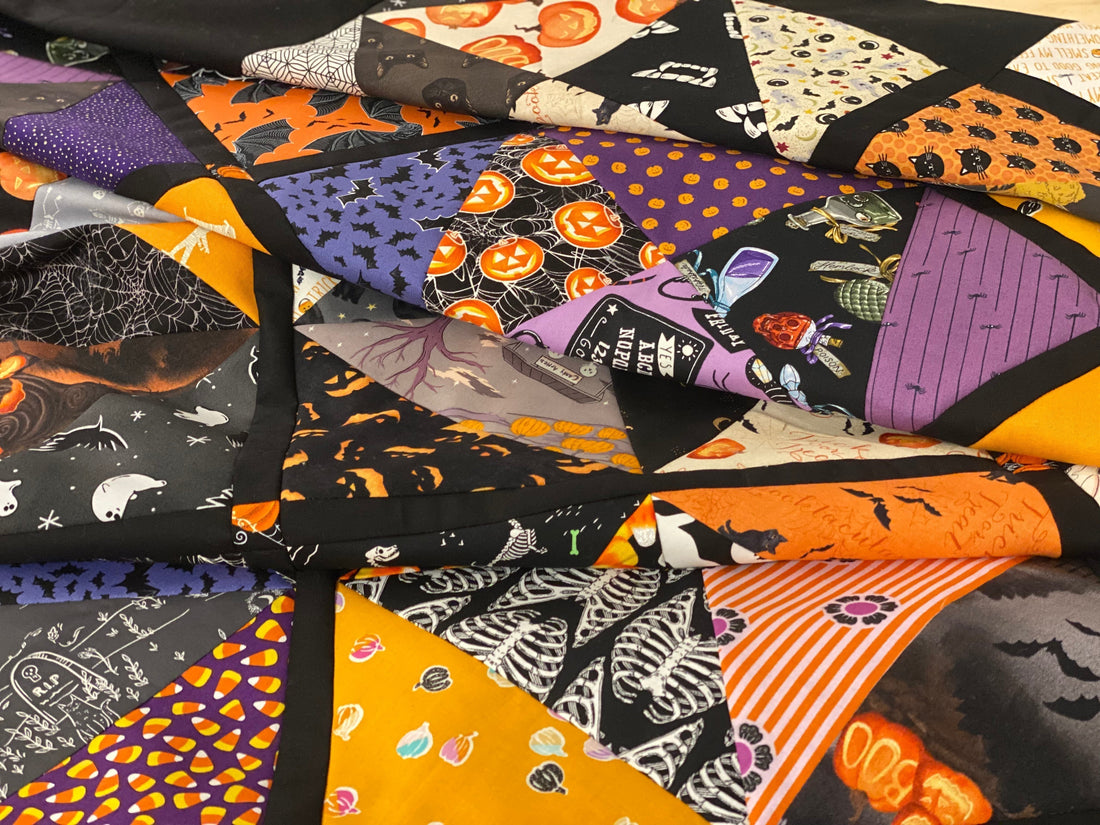
 Something that made me really happy at the end of all this is that the points are not lost! I do not like when I finish a quilt set on point and the outer triangles get cut off. This turned out so nice and even once quilted and binding added, there will still be points!
 Here she is! It finished at 67 x 67! Yay!
I am thrilled to be through some of the roughest parts of this practice test. Phew! I have so many notes about pressing and pinning that will ultimately end up in the pattern. And while I'm glad to have this one finished up, I now also kind of want to make it in other colors and themes now!
 Originally these were the potentials for the backing. But honestly, the front is so busy I'm tempted to just get a flannel wide back in black and call it a day! I also decided to use two of the fabrics in the front of the quilt and I don't want to put them on the back. So I will be on the hunt for something that feels right.
 As for a trip to the long arm, there is no way this would be back in time for Halloween, so it probably won't be featured until next year. And that's okay! It feels good to get something festive made even if it's not being used right away. Considering I can't figure out what I want for the backing, choosing thread and a pattern would probably be a bit troublesome. I think I need something that makes it blend without making it busier. It'll get there eventually!
As foretold in previous posts and emails, there will be a free pattern for this quilt top. However, there is quite a bit more editing and math that needs to go in to it. It will most likely be released in non-Halloween colors by the time I am finished with it. No matter what, it's going to be fun, approachable and free! So keep an eye on the website, and your inbox!
